
Achieving perfect coleslaw with your food processor hinges on selecting the right blade. The slicing disc, specifically a medium or thin slicing disc, is your best friend for creating beautifully uniform and crisp cabbage and carrot shreds. Avoid the S-blade (chopping blade) to prevent mushy, over-processed results. With the correct blade and technique, your food processor will transform into a coleslaw-making marvel, ensuring delicious, restaurant-quality texture with minimal effort.
What Food Processor Blade for Coleslaw
Who doesn’t love a good coleslaw? That perfect balance of crunchy cabbage, crisp carrots, and a creamy, tangy dressing is a staple at picnics, barbecues, and family dinners. But if you’ve ever tried to make coleslaw at home and ended up with a sad, watery, or mushy mess, you know the frustration. The secret often lies in how you prep your vegetables, and more specifically, what food processor blade for coleslaw you choose.
Forget about endless chopping by hand! Your food processor is an absolute game-changer for coleslaw, capable of transforming a whole head of cabbage and a pile of carrots into perfectly shredded goodness in mere seconds. However, using the wrong blade can turn your dream coleslaw into a nightmare. This comprehensive guide will walk you through exactly which food processor blade for coleslaw to use, how to master the technique, and provide all the tips and tricks to ensure your coleslaw is always a crispy, delicious hit.
Let’s dive in and unlock the secret to effortless, perfect coleslaw every single time!
Key Takeaways
- The Slicing Disc is King: For perfect, uniformly shredded coleslaw, always choose your food processor’s slicing disc, not the S-blade.
- Avoid the S-Blade: The standard S-blade (chopping blade) will mince and mush your cabbage, resulting in a watery, undesirable texture for coleslaw.
- Choose the Right Thickness: Most slicing discs offer adjustable thickness or come with different disc options. A medium to thin setting is ideal for classic coleslaw.
- Prep Your Veggies Properly: Cut cabbage and carrots into pieces that fit comfortably through your food processor’s feed chute for consistent results.
- Don’t Overload or Over-process: Work in batches and process quickly to prevent mushiness and ensure an even shred. Less is often more.
- Chill for Best Flavor & Texture: Allow your coleslaw to chill for at least 30 minutes (or longer) before serving to let the flavors meld and the texture firm up.
- Cleanliness is Key: Always clean your food processor blades and bowl immediately after use to maintain their sharpness and hygiene.
Understanding Your Food Processor Blades
Before we talk about the best food processor blade for coleslaw, it’s important to understand the main types of blades and discs that come with most food processors. Knowing what each one does will help you make the right choice for coleslaw and many other recipes.
The S-Blade (Chopping Blade)
This is the standard, two-pronged blade that sits at the bottom of your food processor bowl. It’s often called the chopping blade or utility blade. Its primary function is to chop, mince, puree, and mix ingredients. Think pesto, hummus, nut butter, or finely chopped onions.
For Coleslaw: The S-blade is generally NOT the blade you want for coleslaw. While it can “chop” cabbage, it does so by mincing it into very small, uneven pieces, often releasing too much moisture and resulting in a mushy, watery texture rather than distinct, crunchy shreds. It’s the primary culprit behind coleslaw disasters.
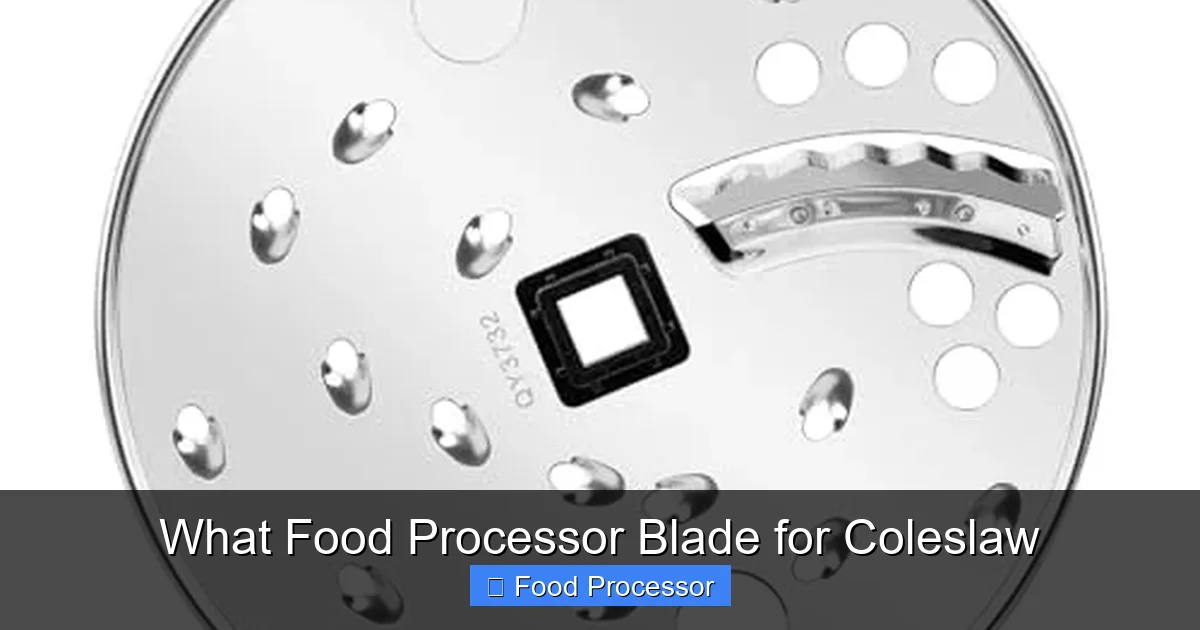
The Slicing Disc
This is a flat, round disc with a single blade (or multiple blades) that sits on top of the food processor bowl, just under the lid. You feed ingredients through the feed chute, and the disc slices them as they pass through. Slicing discs often come in different thicknesses or have an adjustable lever to change the slice thickness.
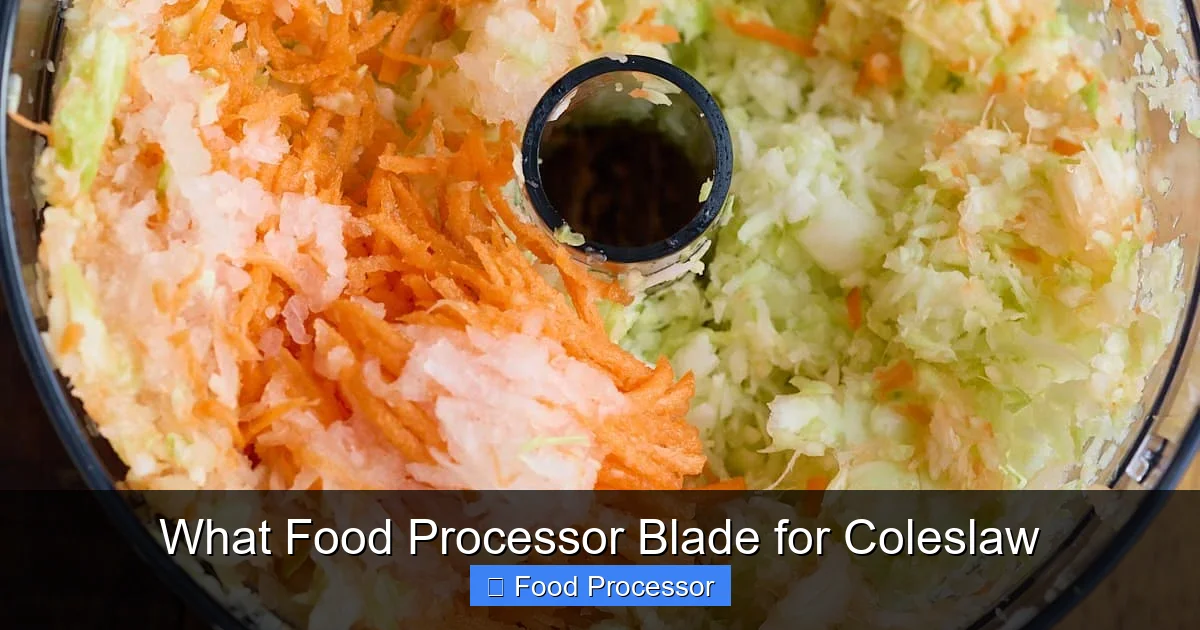
For Coleslaw: *Ding, ding, ding!* This is your hero when it comes to making coleslaw. The slicing disc produces uniform, crisp shreds of cabbage and carrots that retain their structure and crunch. It’s the ideal food processor blade for coleslaw.
The Shredding Disc (Grating Disc)
Similar to the slicing disc, the shredding disc is also a flat, round disc that sits at the top of the bowl. Instead of a single blade, it has multiple sharp holes that grate ingredients as they pass through. These discs also come in various sizes (fine, medium, coarse).
For Coleslaw: The shredding disc can also work for coleslaw, especially if you prefer a coarser texture. It will produce more “grated” pieces rather than clean “slices.” While not as precise as the slicing disc for classic coleslaw, it’s a perfectly acceptable alternative if you don’t have a slicing disc or prefer a different texture. It’s still far superior to the S-blade.
The Best Food Processor Blade for Coleslaw: The Slicing Disc
Without a doubt, the slicing disc is the absolute best food processor blade for coleslaw. It excels at creating perfectly uniform, thin, or medium-sized shreds of cabbage and carrots, which is the hallmark of a great coleslaw. If you’re looking for the best food processor for coleslaw, make sure it comes with a good quality slicing disc!
Why the Slicing Disc is Superior
- Uniformity: It creates consistent shreds, ensuring every bite has the same delightful texture.
- Texture: The clean cut from a slicing disc helps the vegetables retain their crispness, preventing them from becoming mushy.
- Efficiency: It processes large quantities of vegetables incredibly quickly, saving you valuable time and effort compared to hand-chopping.
Choosing the Right Thickness
Most slicing discs offer a range of thicknesses. For traditional coleslaw, you’ll generally want a medium-thin setting. If your disc isn’t adjustable, choose the disc labeled “medium” or “thin.” Experiment to find your preference, but avoid overly thick slices that can be tough, or excessively thin ones that might wilt too quickly. The slicing disc is incredibly versatile and is often highlighted as the best food processor for slicing vegetables in general, making it a great all-rounder for your kitchen.
Step-by-Step: Using Your Food Processor for Perfect Coleslaw
Ready to make some delicious coleslaw? Here’s how to use your food processor with the right blade to achieve perfect results every time.
Step 1: Gather Your Ingredients and Equipment
You’ll need:
Visual guide about What Food Processor Blade for Coleslaw
Image source: myforkinglife.com
Visual guide about What Food Processor Blade for Coleslaw
Image source: m.media-amazon.com
- A head of green cabbage (or a mix of green and red cabbage)
- 2-3 medium carrots
- Your food processor
- The slicing disc attachment
- A large mixing bowl
- Coleslaw dressing ingredients (mayonnaise, vinegar, sugar, salt, pepper, etc.)
Step 2: Prepare Your Cabbage and Carrots
Wash and Trim Cabbage
Remove any wilted or damaged outer leaves from your head of cabbage. Rinse it thoroughly under cold water. Cut the cabbage into quarters or eighths, depending on the size of your cabbage and the width of your food processor’s feed chute. Make sure each piece can fit easily. Trim out the tough core from each section.
Wash and Peel Carrots
Wash your carrots and peel them if desired. Cut them into lengths that fit into your food processor’s feed chute. If they are very thick, you might want to cut them in half lengthwise.
Step 3: Assemble Your Food Processor
Install the Slicing Disc
Place the food processor bowl onto the base. Carefully install the slicing disc onto the central spindle. Ensure it’s securely seated. Place the lid on top, locking it into place. Make sure the feed chute is open.
Pro Tip: Double-check that you’ve got the slicing disc and not the S-blade installed! This is the most common mistake when making food processor coleslaw.
Step 4: Process the Cabbage
Feed Cabbage Through the Chute
Turn your food processor on to a steady speed (usually “on” or “high,” not “pulse”). Take a piece of prepared cabbage and place it into the feed chute. Use the food pusher to gently and steadily guide the cabbage down onto the spinning slicing disc. Avoid forcing it; let the blade do the work.
Process in Batches (If Needed)
If you have a larger head of cabbage or a smaller food processor bowl, you may need to process the cabbage in batches. Continue feeding the cabbage pieces until all of it has been sliced. The sliced cabbage will collect in the bowl below the disc.
Step 5: Process the Carrots
Slice Carrots Separately
Once all the cabbage is processed, you can either remove it to your mixing bowl or, if there’s enough space, slice the carrots directly into the same bowl. Place the prepared carrot pieces into the feed chute and use the food pusher to guide them through.
Note: Some people prefer to hand-grate carrots for coleslaw for a slightly different texture. However, using the slicing disc for carrots also works perfectly well and maintains consistency with the cabbage.
Step 6: Combine and Dress
Transfer to a Large Bowl
Once all your cabbage and carrots are processed, carefully remove the lid and slicing disc (handle with care, as the blades are very sharp!). Transfer the shredded vegetables to a large mixing bowl.
Add Your Dressing
Pour your favorite coleslaw dressing over the shredded vegetables. Start with about half the dressing and toss everything together. Add more dressing as needed to achieve your desired level of creaminess. The sheer efficiency and consistency a food processor offers are among the primary advantages of a food processor, especially for tasks like this.
Chill and Serve
For the best flavor and texture, cover the bowl and refrigerate your coleslaw for at least 30 minutes, or even a few hours, before serving. This allows the flavors to meld and the cabbage to slightly soften while still retaining its crunch.
Tips for Food Processor Coleslaw Perfection
Mastering your food processor blade for coleslaw is simple with a few key tips:
Don’t Overload the Feed Chute
While it’s tempting to cram as much cabbage as possible into the chute, don’t do it. Overloading can cause the motor to strain, lead to uneven slicing, or even jam the machine. Feed pieces at a steady, manageable pace.
Use the Food Pusher Properly
The food pusher is there for a reason – use it! It keeps your fingers safe and applies even pressure to the ingredients, ensuring uniform slicing. Don’t press too hard, as this can strain the motor or lead to inconsistent results. Gentle, steady pressure is key.
Chill Your Coleslaw for Best Flavor and Texture
This isn’t just a suggestion, it’s a vital step for truly great coleslaw. Chilling allows the flavors from the dressing to meld with the vegetables and gives the cabbage a chance to slightly soften without losing its crispness.
Experiment with Slicing Thickness
If your food processor has an adjustable slicing disc, play around with different thickness settings. A slightly thicker shred might be great for a heartier coleslaw, while a very thin shred could be perfect for a delicate side dish.
Add Other Veggies for Variety
Don’t stop at just cabbage and carrots! Your food processor can quickly slice other vegetables for your coleslaw mix. Think thinly sliced red onion, bell peppers, or even apple for a fruity twist.
The Power of Pulsing (When Appropriate)
While you typically use a continuous “on” setting for slicing discs, pulsing can be useful if you’re trying to get a slightly coarser chop with the S-blade for other dishes. For coleslaw, however, stick to the continuous setting with the slicing disc. Pulsing with the S-blade for coleslaw will almost always result in a mushy mess.
Troubleshooting Common Coleslaw Challenges
Even with the best intentions, sometimes things don’t go exactly as planned. Here are some common problems when using a food processor for coleslaw and how to fix them.
Problem: My coleslaw is too mushy!
Solution: This is almost always due to using the wrong blade – the S-blade (chopping blade) – or over-processing with the slicing disc. Ensure you are using the slicing disc for your cabbage and carrots. If you are using the slicing disc, make sure you’re feeding the vegetables steadily and not letting them sit on the spinning blade for too long after they’ve been cut. Work quickly, and empty the bowl when it’s full.
Problem: My coleslaw pieces are uneven!
Solution: Uneven pieces usually stem from inconsistent feeding. Make sure your cabbage and carrot pieces are cut to fit the feed chute properly. Don’t try to force awkwardly shaped pieces. Also, apply steady and even pressure with the food pusher. If the pieces are still uneven, your blade might be dull, or your food processor might lack sufficient power. If you’re still in the market or curious about upgrading, knowing what to look for when buying a food processor can make a huge difference in performance.
Problem: My food processor isn’t slicing cleanly / is struggling!
Solution: Several factors could be at play here. First, check that the slicing disc is installed correctly and securely. Second, your blade might be dull. Over time, blades can lose their sharpness, leading to tearing rather than clean slicing. Third, you might be trying to process too much at once, or your food processor simply doesn’t have enough power for harder vegetables. Consider the size and wattage of your machine. If you are regularly making coleslaw, choosing a powerful model is ideal. Fourth, ensure your vegetables are fresh and firm; wilted veggies are harder to slice cleanly.
Beyond Cabbage and Carrots: Other Coleslaw Ingredients
Your food processor, armed with the trusty slicing disc, can do so much more for your coleslaw:
- Red Cabbage: Adds beautiful color and a slightly different flavor. Slice it just like green cabbage.
- Broccoli Stems: Don’t throw them away! Peel the tough outer layer, then slice the stems for a unique, crunchy addition.
- Apples: For a sweet and tangy twist, core and slice apples (like Granny Smith or Honeycrisp) thinly.
- Onions: Thinly slice a quarter of a red onion for a zesty kick.
- Bell Peppers: Seed and slice bell peppers (any color) for extra crunch and sweetness.
All these ingredients benefit from the precision of the slicing disc, making your food processor an essential tool for varied and creative coleslaw recipes.
Maintaining Your Food Processor Blades
To ensure your food processor blades, especially your invaluable slicing disc, stay sharp and efficient for perfect coleslaw for years to come, proper maintenance is crucial.
Cleaning and Care
Always clean your blades immediately after use. Food residue can dry and become difficult to remove, potentially dulling the blades over time. Most blades and bowls are dishwasher-safe (check your manual), but hand washing with warm, soapy water is often best to preserve sharpness and prevent rust. Be extremely careful when handling sharp blades!
When to Replace Blades
Over years of use, even the highest quality blades can dull. If you notice your food processor struggling to slice cleanly, tearing vegetables instead of smoothly cutting them, or if the results are consistently mushy despite correct technique, it might be time to replace your slicing disc. Check your food processor’s manufacturer website for replacement parts.
Conclusion
Mastering the art of coleslaw with your food processor boils down to one critical choice: the blade. By consistently choosing the slicing disc, you’re setting yourself up for success, ensuring crisp, uniformly shredded vegetables that form the foundation of an outstanding coleslaw. Say goodbye to mushy disappointments and hello to perfectly textured, homemade coleslaw that will impress everyone.
With your food processor and the right blade, making coleslaw is no longer a chore but a quick and enjoyable step in your meal prep. So go ahead, grab that cabbage, attach your slicing disc, and get ready to enjoy the crunch!