
Discover how incredibly simple it is to make butter in your food processor. This guide walks you through transforming heavy cream into rich, homemade butter with minimal effort. You’ll learn the essential steps, from preparing your ingredients to the crucial washing and flavoring of your butter, ensuring a fresh, delicious result every time. Say goodbye to store-bought and hello to custom, homemade goodness!
How to Make Butter Food Processor
Imagine spreading rich, creamy, homemade butter on your morning toast, knowing exactly what went into it. Sounds delightful, doesn’t it? Well, guess what – it’s not a fantasy reserved for expert chefs or farm-dwellers! With a simple kitchen appliance, your trusty food processor, you can easily make butter right in your own kitchen.
Many people are surprised to learn that making butter at home is incredibly straightforward. You don’t need a special churn or any complicated techniques. Your food processor, designed for various kitchen tasks, is perfectly capable of transforming humble heavy cream into golden, delicious butter. This guide will walk you through every step, from selecting the right cream to washing and flavoring your freshly made butter. You’ll be amazed at how quickly you can create a superior product that tastes infinitely better than anything store-bought.
Making your own butter isn’t just about the incredible flavor; it’s also about control. You choose the quality of the ingredients, you decide if it’s salted or unsalted, and you can even infuse it with your favorite herbs or spices. It’s a fun, rewarding culinary experiment that yields a truly delicious and versatile staple. So, let’s roll up our sleeves and learn how to get the most out of your food processor by making butter!
Key Takeaways
- Simplicity and Speed: Making butter in a food processor is a surprisingly fast and straightforward process, transforming cream into butter in just minutes.
- Quality Ingredients Matter: Always start with high-quality, cold heavy cream (at least 35% milk fat) for the best texture and flavor in your homemade butter.
- Understand the Stages: The cream will visibly progress through several stages – whipped cream, stiff peaks, grainy, and finally separation into butter solids and buttermilk – stay patient and watch for these transformations.
- Washing is Crucial: Thoroughly washing the butter with ice-cold water is the most critical step. It removes all residual buttermilk, which prevents spoilage and ensures a clean, pure butter flavor.
- Customization Potential: Homemade butter offers endless opportunities for customization; easily add salt, herbs, garlic, or sweet flavors to create unique compound butters.
- Proper Storage for Longevity: Store your fresh, homemade butter in an airtight container in the refrigerator to maximize its shelf life and maintain its delicious taste.
What You’ll Need: Equipment and Ingredients
Before you dive into the churning process, let’s gather everything you need. The beauty of this method is its simplicity, requiring minimal specialized equipment.
Equipment
- Food Processor: This is your star player. Make sure it’s a good-sized one, at least 8-cup capacity, as the cream will expand as it whips. If you’re wondering how to choose the right size food processor for various tasks, remember that larger bowls are always better for things that expand or require ample processing space. Ensure it has a sharp S-blade (also known as the multi-purpose blade).
- Fine-Mesh Sieve or Colander: Essential for separating the butter from the buttermilk.
- Large Bowl: You’ll need this for collecting the buttermilk and for washing the butter.
- Spatula or Scraper: To help scrape down the sides of the food processor and gather the butter.
- Cheesecloth (Optional but Recommended): This helps in squeezing out excess buttermilk and water during the washing process.
- Ice Water: Plenty of it! This is crucial for washing your butter.
- Rubber Gloves (Optional): Your hands will get messy, and gloves can make cleanup easier, especially during the washing phase.
Ingredients
- Heavy Cream: This is the only mandatory ingredient. You’ll need at least 2 cups, but 3-4 cups is ideal for a decent yield of butter. Look for heavy cream with at least 35% milk fat. Organic or local cream can often yield even richer, tastier butter. Make sure it’s very cold, straight from the refrigerator.
- Ice: For the ice water bath.
- Salt (Optional): If you want salted butter, use fine sea salt or kosher salt. About 1/2 teaspoon per stick (1/2 cup) of butter is a good starting point.
Step-by-Step Guide to Make Butter Food Processor
Ready to turn that cream into glorious butter? Follow these steps carefully, and you’ll have delicious homemade butter in no time.
Visual guide about How to Make Butter Food Processor
Image source: jodysbakery.com
Step 1: Chill Your Equipment (The Secret to Success!)
This step is often overlooked but it’s incredibly important. Just like when you whip cream, keeping everything cold helps the fat globules come together faster and more efficiently. Cold temperatures prevent the cream from becoming greasy and yield a firmer, better-textured butter.
- Chill the Food Processor Bowl and Blade: Place the food processor bowl and the S-blade in your freezer for at least 15-20 minutes, or in the refrigerator for an hour.
- Prepare Your Ice Water: Fill a large bowl with ice cubes and cold water. Set it aside for later. You’ll use this to wash the butter.
Step 2: Add Cream to Your Food Processor
Once your food processor bowl and blade are nicely chilled, it’s time to add the star ingredient.
- Assemble Your Food Processor: Make sure your chilled S-blade is properly installed in the chilled food processor bowl. If you’re unsure how to assemble your food processor step by step, refer to your appliance manual or our detailed guide.
- Pour in the Heavy Cream: Pour your cold heavy cream into the food processor bowl. Do not fill it more than halfway, as the cream will expand significantly during processing. If you have a lot of cream, you might need to work in batches.
- Secure the Lid: Place the lid on your food processor, ensuring it’s locked securely in place. This prevents any splatters as the cream begins to churn.
Step 3: Begin Churning (Watch the Magic Unfold!)
Now for the exciting part! Turn on your food processor and let it work its magic. You’ll notice distinct stages as the cream transforms. Be patient, it might seem like it’s taking a while, but it will happen!
- Process Continuously: Turn the food processor on to a medium-high setting (usually “on” or “high,” not pulse). Let it run continuously.
- Observe the Stages: The cream will go through several predictable stages.
Stage 1: Whipped Cream
Initially, the cream will thicken into soft whipped cream, then progress to stiff peaks. This usually takes 1-2 minutes. It will look like perfect whipped cream, but keep going!
Stage 2: Stiff Peaks and Slight Graininess
As you continue processing, the whipped cream will become even stiffer, almost clumpy, and you might start to see a slightly grainy texture. This is a sign that the fat globules are beginning to come together.
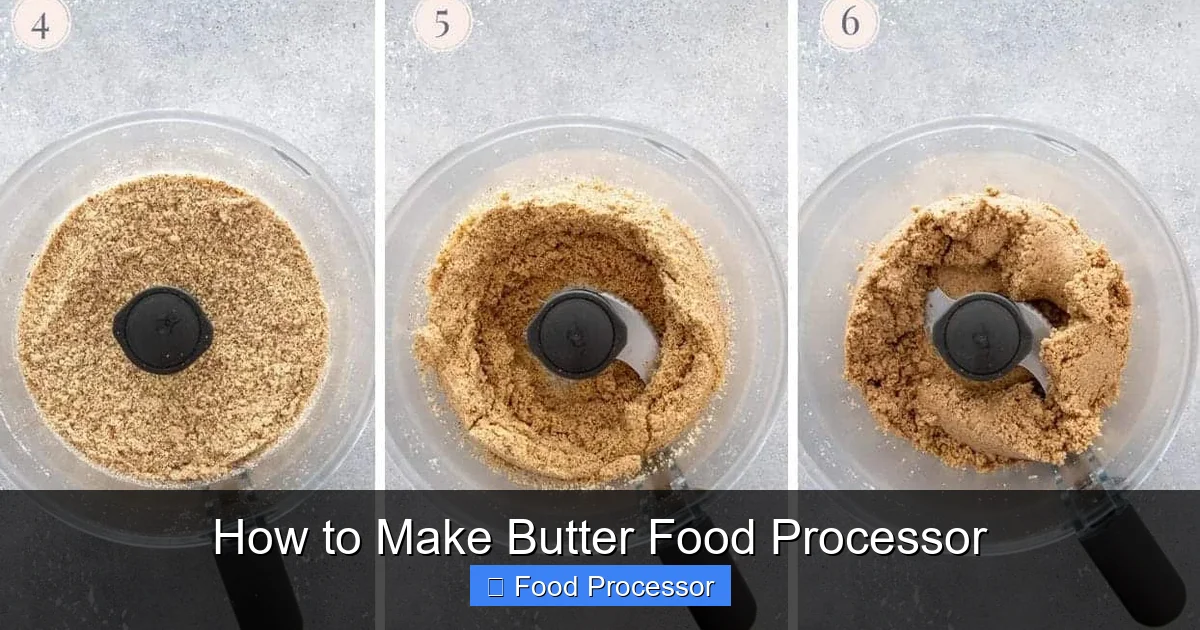
Stage 3: Grainy Texture and Yellowing
The mixture will become distinctly grainy, and the color will start to change from pure white to a pale yellow. It will look like very thick, crumbly ricotta cheese. The sound of your food processor might also change slightly as the mixture thickens further.
Stage 4: Butter and Buttermilk Separation
This is the moment you’ve been waiting for! Suddenly, the grainy mixture will break. You’ll see distinct clumps of yellow butter solids separating from a milky liquid. This liquid is buttermilk! It might splatter a bit inside the food processor, but the lid should keep it contained. Continue processing for another 30 seconds to a minute after separation to ensure all the butter solids have coalesced.
Step 4: Separate Butter from Buttermilk
Once your butter and buttermilk have clearly separated, it’s time to drain the buttermilk.
- Carefully Remove the Lid: Unplug your food processor and carefully remove the lid.
- Remove the S-blade: Gently lift out the S-blade, scraping off any butter clinging to it back into the bowl.
- Strain the Butter: Place your fine-mesh sieve or colander over a large bowl. Carefully pour the contents of the food processor into the sieve. The buttermilk will drain into the bowl below, and the solid butter will remain in the sieve.
- Save the Buttermilk: Don’t throw away that fresh buttermilk! It’s fantastic for baking (pancakes, biscuits, cornbread) or for marinades. Cover and refrigerate it.
Step 5: Wash the Butter (The Most Important Step!)
Washing the butter is critical for both flavor and shelf life. Any remaining buttermilk will cause your butter to spoil quickly and give it an off-flavor. This step ensures pure, fresh butter.
- Transfer to Ice Water: Transfer the butter solids from the sieve into your prepared bowl of ice water.
First Wash
Using your hands (gloves are helpful here!), begin to knead and press the butter under the ice water. You’ll see the water immediately turn cloudy with buttermilk. Squeeze the butter repeatedly to force out the liquid. Discard the cloudy water.
Subsequent Washes
Refill the bowl with fresh ice water. Continue to knead, press, and squeeze the butter, changing the water each time it becomes cloudy. You’ll likely need to do this 3-5 times. The goal is for the water to remain clear after squeezing the butter. This indicates that almost all the buttermilk has been removed. Be thorough – this is the key to preventing sour butter!
Squeezing Out Remaining Water
Once the water runs clear, form the butter into a ball or log. You can wrap it in cheesecloth at this stage and twist the ends, squeezing firmly to extract any last drops of water. This helps ensure your butter is firm and won’t weep water later.
Step 6: Flavor Your Butter (Optional)
Now that you have beautiful, fresh, unsalted butter, you can choose to leave it as is or add flavor!
- Add Salt: If you want salted butter, transfer the washed butter to a clean bowl. Sprinkle fine sea salt or kosher salt over it (start with 1/2 teaspoon per 1/2 cup of butter). Use a spatula or your hands to thoroughly knead the salt into the butter until evenly distributed. Taste and adjust as needed.
- Create Compound Butters: This is where the fun really begins! You can add finely chopped fresh herbs (rosemary, thyme, parsley, chives), minced garlic, lemon zest, honey, cinnamon, or even a dash of maple syrup. Mix these into the butter as you would with salt.
Step 7: Shape and Store Your Homemade Butter
Almost there! Now, let’s get your butter ready for storage.
- Shape the Butter: You can press the butter into a butter mold, roll it into a log using parchment paper or plastic wrap, or simply place it into an airtight container. If making logs, roll it tightly and twist the ends of the parchment/wrap to seal.
- Chill: Place your shaped butter in the refrigerator for at least an hour to firm up completely before serving or storing.
- Storage: Store your homemade butter in an airtight container or tightly wrapped in the refrigerator. It typically lasts about 1-2 weeks. For longer storage, you can freeze butter for several months. Just be sure to wrap it very well to prevent freezer burn.
Tips for Success When You Make Butter Food Processor
- Use Very Cold Cream: We can’t stress this enough. Cold cream processes faster and yields better butter.
- Don’t Overfill: Only fill your food processor bowl halfway. Cream expands significantly, and overfilling will lead to a mess and potentially less efficient churning.
- Be Patient but Vigilant: It might feel like forever during the initial whipping stages, but once the cream starts to look grainy, the separation happens very quickly. Keep an eye on it to avoid over-processing after separation. While it’s good to know how long you can leave a food processor running for other tasks, for butter, the total time is usually under 10 minutes.
- Wash, Wash, Wash: The thoroughness of your washing step directly impacts the shelf life and flavor of your butter. Don’t rush it. Clear water is your signal!
- Experiment with Cream Types: While heavy cream is standard, you can also experiment with different types of cream, like pasture-raised or organic, for subtle flavor variations. Some even use raw cream (if safely sourced).
- Utilize Buttermilk: Remember, the buttermilk is a delicious byproduct! Use it in baking, smoothies, or marinades.
Troubleshooting Your Homemade Food Processor Butter
Even with simple recipes, sometimes things don’t go exactly as planned. Here are some common issues and how to fix them when you make butter in your food processor.
Visual guide about How to Make Butter Food Processor
Image source: eatmorebutter.com
Butter Not Forming
- "It’s just whipped cream!": This is the most common concern. Don’t worry, you’re on the right track! Just keep processing. It takes time for the fat globules to coalesce. Depending on your cream and food processor, it can take anywhere from 5-10 minutes (sometimes longer if the cream isn’t cold enough or has lower fat content).
- Cream Not Cold Enough: If your cream was at room temperature or not thoroughly chilled, it might take longer or struggle to form butter. Next time, ensure your cream and equipment are very cold.
- Low-Fat Cream: Ensure you are using heavy cream (35% milk fat or higher). "Whipping cream" (around 30-34% milk fat) might work but will take longer and yield less butter. "Half-and-half" or "light cream" will not work.
Butter is Soft or Greasy
- Cream Was Too Warm: If your cream wasn’t cold enough, or if your kitchen is very warm, the butter might come out softer or greasier than desired. Chilling the equipment helps with this.
- Over-processing After Separation: While you want to process enough for separation, running the food processor for too long *after* the butter has clearly separated can sometimes start to warm the butter and make it too soft.
- Not Enough Washing: Insufficient washing can leave too much buttermilk in the butter, making it softer and more prone to spoilage. Ensure the wash water runs clear.
Butter Tastes Off or Sour Quickly
- Incomplete Washing: This is almost always the culprit for sour or spoiled-tasting butter. Residual buttermilk ferments and goes bad, even when refrigerated. You must wash thoroughly until the water is completely clear.
- Old Cream: While the process separates butter from buttermilk, using cream that is already past its prime will result in butter that also has an off-flavor. Always start with fresh, good-quality cream.
Conclusion
Congratulations! You’ve successfully learned how to make butter food processor style. This simple yet rewarding culinary skill opens up a world of fresh flavors and customization possibilities. From the satisfying hum of your food processor transforming cream to the delightful taste of homemade butter spread on warm bread, this process is an experience in itself.
You now have control over the ingredients, the salt content, and the potential to infuse your butter with any flavors your heart desires. No more guessing what additives are in your store-bought butter – just pure, delicious dairy made with your own two hands. So go ahead, experiment, share your creations, and enjoy the unparalleled taste of your very own homemade butter. Happy churning!