
Wondering how long does food processing take? The truth is, it varies greatly depending on the task, ingredients, and your food processor. From a few seconds for chopping vegetables to several minutes for making nut butter, mastering the pulse button and understanding your machine are key to achieving perfect consistency every time without over-processing.
How Long Does Food Processing Take?
Ever found yourself staring at your food processor, wondering just how long it’ll take to transform those fresh veggies into a perfect pesto or a finely chopped salsa? You’re not alone! It’s one of the most common questions home cooks ask. The truth is, there isn’t one magic answer for “how long does food processing take.” The duration can swing wildly from a mere few seconds to several minutes, all depending on what you’re trying to achieve and what ingredients you’re working with.
In this comprehensive guide, we’re going to demystify food processing times. We’ll explore the factors that influence how long your food processor needs to do its job, give you practical timelines for common tasks, and share expert tips to help you get perfect results every single time. By the end, you’ll feel confident knowing exactly when to start and stop your machine, ensuring your culinary creations are always spot on.
Key Takeaways
- No Universal Answer: The time food processing takes is highly variable, depending on the specific task (chopping, pureeing, shredding), the type and quantity of ingredients, and the power of your food processor.
- Pulse is Your Best Friend: For most tasks, especially chopping and mincing, using short bursts of the pulse function gives you greater control, preventing over-processing and ensuring even results.
- Ingredient Prep Matters: Pre-cutting ingredients into uniform, smaller pieces before adding them to the food processor can significantly reduce processing time and lead to a more consistent final product.
- Monitor Closely: Always keep a watchful eye on the contents of your food processor. Processing times are often very short, and a few extra seconds can turn perfectly chopped vegetables into mush.
- Blade and Attachment Choice: Using the correct blade (e.g., S-blade for chopping, shredding disc for grating) and attachment for the task at hand is crucial for efficiency and achieving the desired outcome.
- Know Your Machine: Familiarize yourself with your specific food processor’s power and functions. More powerful machines generally process food faster, but still require careful monitoring.
Understanding the Variables: What Affects Food Processing Time?
Before we dive into specific timings, it’s important to understand *why* the answer to “how long does food processing take” isn’t a simple number. Several key factors play a big role:
Ingredient Type and Texture
This is perhaps the biggest factor. Soft foods like cooked beans, tomatoes, or ripe bananas will process much faster than hard ingredients like raw carrots, nuts, or hard cheeses. Meats, depending on their cut and tenderness, will also have varying processing times.
Desired Consistency
Are you aiming for a coarse chop, a fine mince, a smooth puree, or a dough? Each of these outcomes requires different processing durations. A chunky salsa needs less time than a silky smooth hummus.
Quantity of Ingredients
While a food processor is designed to handle a good amount, overfilling it can actually slow down the process and lead to uneven results. Processing in smaller batches often leads to more efficient and consistent outcomes.
Food Processor Power and Blade Type
A high-wattage, more powerful food processor will generally process food faster than a lower-wattage model. Additionally, using the correct blade or disc for the task is critical. The standard S-blade is great for chopping and pureeing, while shredding or slicing discs are designed for specific cuts and will complete those tasks almost instantly.
Pulse vs. Continuous Processing
The way you operate your food processor makes a huge difference. Using the pulse function (quick bursts) gives you maximum control, especially for chopping or mincing. Continuous processing is better for pureeing or kneading dough but can quickly lead to over-processing if not monitored.
General Timelines for Common Food Processing Tasks
Let’s get down to some practical estimates. Remember, these are guidelines. Always start with shorter times and check frequently.
Chopping Vegetables (Onions, Carrots, Celery, Peppers)
For a coarse chop, you’re looking at about 5-10 short pulses. If you want a finer chop or mince, it might take 10-20 pulses, or a few seconds of continuous processing (3-5 seconds). Always pre-cut vegetables into 1-2 inch pieces for even results. If you need to know how to use a food processor to chop vegetables, remember that monitoring closely is key.

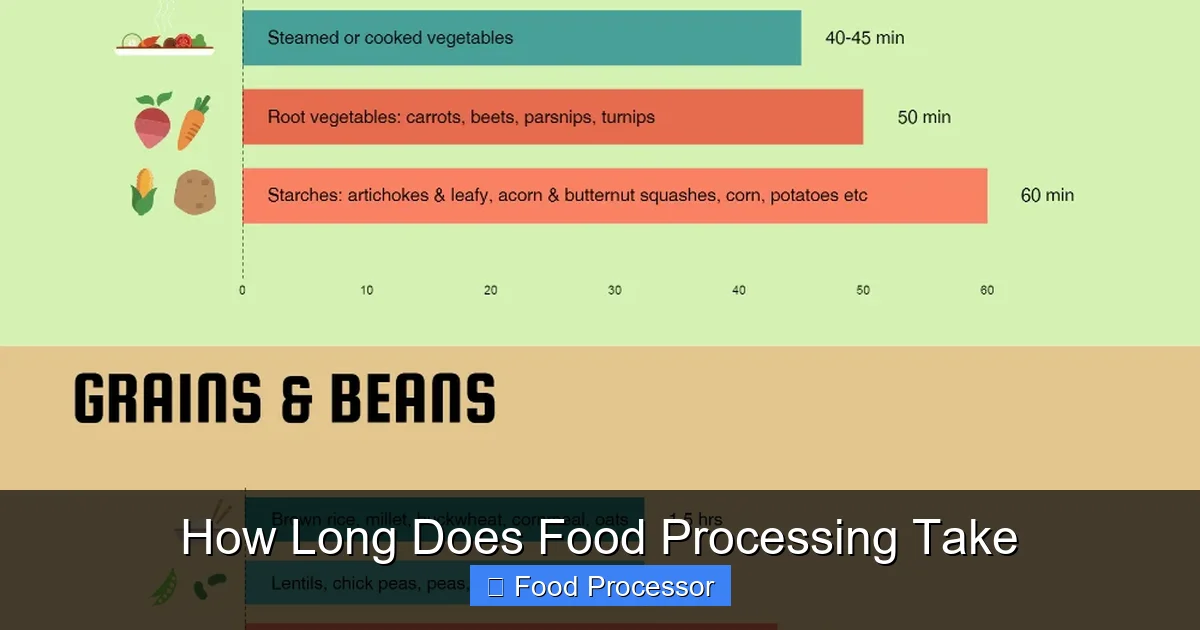
Visual guide about How Long Does Food Processing Take
Image source: foodfactstips.com
Shredding Cabbage or Cheese
Using the shredding disc, this is incredibly fast. Cabbage or block cheese (pre-cut to fit the feed tube) will be shredded in just 10-30 seconds of continuous processing, depending on the quantity. For instance, knowing how to use a food processor to shred cabbage can save you significant time compared to manual shredding.
Slicing Vegetables (Cucumbers, Potatoes, Tomatoes)
With a slicing disc, these tasks are lightning fast. A single cucumber or potato can be sliced in 5-10 seconds. Just ensure your ingredients fit the feed tube and apply gentle, consistent pressure.
Mincing Garlic or Herbs
This takes very little time. For a few cloves of garlic or a handful of herbs, 3-8 short pulses are usually enough. Add a tiny bit of olive oil for a smoother paste, if desired.
Making Purees (Soups, Sauces, Baby Food, Hummus)
Pureeing generally requires continuous processing. Depending on the desired smoothness and the ingredients, this can take anywhere from 30 seconds to 2 minutes. Add liquids gradually through the feed tube to achieve the perfect consistency. For very smooth purees, you might process for longer, ensuring no lumps remain.
Grinding Nuts (for Flour or Meal)
Grinding nuts into a coarse meal takes about 10-20 seconds of pulsing. If you want a finer flour, it might take 30-60 seconds, often with short bursts to prevent it from turning into butter. For almond flour, you’re often looking at around 45-60 seconds of pulsing and short bursts.
Making Nut Butter
This is one of the longer tasks. Starting with roasted nuts, it can take 3-7 minutes of continuous processing. The nuts will go through stages: coarse meal, fine meal, sticky ball, then eventually smooth butter. You’ll need to stop and scrape down the sides frequently.
Making Dough (Pie Crust, Pizza Dough, Cookie Dough)
The time for dough depends on the recipe. For pie crusts, pulsing in cold butter with flour typically takes 20-40 seconds until crumbly, then adding water for another 10-20 seconds of pulsing until just combined. For yeast doughs, kneading in a food processor can take 30 seconds to 2 minutes of continuous processing, depending on the dough’s hydration and the machine’s power, until a smooth ball forms.
Step-by-Step Guide to Efficient Food Processing
To ensure you get the best results in the least amount of time, follow these steps:
Step 1: Prep Your Ingredients
This is a crucial first step that directly impacts how long does food processing take. Cut your ingredients into uniform, manageable pieces. For most tasks with the S-blade, 1 to 2-inch pieces are ideal. Remove any tough stems, cores, or pits. If you’re shredding or slicing, make sure the ingredients fit comfortably into the feed tube.
Visual guide about How Long Does Food Processing Take
Image source: i.pinimg.com
Step 2: Assemble Your Food Processor Correctly
Ensure the bowl, blade/disc, and lid are securely locked into place. Refer to your owner’s manual if you’re unsure how to assemble it. A properly assembled machine operates safely and efficiently. If you need a refresher, check out guides like how do you use a food processor step by step to ensure you’re set up for success.
Step 3: Choose the Right Blade or Attachment
- S-blade (or “Chopping Blade”): This is your workhorse for chopping, mincing, pureeing, grinding, and mixing doughs.
- Shredding Disc: Perfect for grating cheese, cabbage, carrots, or potatoes.
- Slicing Disc: Ideal for uniformly slicing vegetables and fruits.
- Dough Blade (Plastic): Some food processors come with a specialized dough blade for kneading.
Step 4: Load Ingredients Strategically
Do not overfill the food processor bowl. Generally, fill the bowl no more than two-thirds full for chopping or pureeing, and often less for doughs. Overfilling can strain the motor, lead to uneven processing, and increase the time it takes. For shredding or slicing, feed ingredients through the feed tube one by one using the pusher.
Step 5: Master the Pulse Function
For most chopping, mincing, and grinding tasks, the pulse button is your best friend. Instead of continuous processing, use short bursts of power (1-2 seconds each) and pause to observe the consistency. This gives you precise control and prevents over-processing. Continuous processing is better reserved for purees, doughs, or making nut butter.
Step 6: Scrape Down the Sides
During processing, especially for purees or nut butter, ingredients tend to stick to the sides of the bowl. Stop the machine, remove the lid, and use a spatula to scrape down the sides, pushing ingredients back towards the blade. This ensures even processing and helps your food processor work more efficiently, often reducing the overall time it takes.
Step 7: Monitor and Check Consistency Frequently
This cannot be stressed enough. Always keep an eye on your food processor while it’s running. Food processing can happen very quickly. A second too long can turn chunky salsa into soup, or crunchy nuts into oily paste. Stop, remove the lid, and check the texture with a spoon or your fingers. If it’s not quite there, process for a few more pulses or seconds.
Step 8: Know When to Stop
The moment your ingredients reach your desired consistency, stop the machine immediately. There’s no benefit in letting it run longer, as it will only lead to over-processing. Remember that the goal isn’t to see how long can you leave a food processor running; it’s about achieving the perfect result efficiently.
Tips for Optimal Processing Time and Results
* Batch Wisely: If you have a large quantity of ingredients, process them in smaller batches rather than trying to cram everything in at once. This improves efficiency and consistency.
* Cold Ingredients for Pastry: When making pie crusts or biscuits, ensure butter is very cold and cut into small pieces. This helps create flaky results and prevents overmixing.
* Room Temperature for Purees (mostly): For most purees (like hummus or vegetable purees), room temperature or slightly warmed ingredients often blend more smoothly and quickly.
* Add Liquids Gradually: When making purees, dressings, or sauces, add liquids (water, oil, broth) slowly through the feed tube while the machine is running. This allows you to control the consistency precisely.
* Clean As You Go: A clean food processor is an efficient one. Wash parts immediately after use to prevent food from drying and sticking, which can affect future performance.
* Don’t Force It: If your food processor seems to be struggling, don’t force it. Check if you’ve overloaded it, if ingredients are too large, or if the blade is jammed. Forcing it can damage the motor. To get the most out of your food processor, address issues promptly.
Troubleshooting Common Timing and Consistency Issues
Even with the best intentions, things can sometimes go awry. Here are common issues and how to fix them:
Issue: Over-processing (Mushy, Too Fine)
Cause: Running the food processor for too long or using continuous processing when pulsing was needed.
Solution: Learn to rely on the pulse button. Use very short bursts and check frequently. For next time, reduce processing time significantly.
Issue: Under-processing (Uneven Chunks, Not Smooth Enough)
Cause: Not enough processing time, too many ingredients, or ingredients not pre-cut uniformly.
Solution:
- Process for a few more pulses or seconds.
- Stop and scrape down the sides to ensure all ingredients are engaged with the blade.
- If pieces are too large, remove them, cut them smaller, and reintroduce.
- Ensure you’re not overfilling the bowl; process in smaller batches if necessary.
Issue: Ingredients Sticking to Sides or Blade
Cause: Not enough liquid for purees, ingredients too dry, or a very full bowl.
Solution:
- Stop the machine and scrape down the sides with a spatula.
- For purees, gradually add a tablespoon or two of liquid (water, oil, broth) through the feed tube while processing.
- Ensure ingredients are properly sized before adding.
Issue: Food Processor Stalling or Struggling
Cause: Overloaded bowl, ingredients are too hard, or dull blades.
Solution:
- Reduce the amount of ingredients in the bowl.
- Pre-cut harder ingredients into smaller pieces.
- Check if the blade needs sharpening or replacement (though this is rare for most home users).
- Allow the motor to cool if it feels warm.
Conclusion: Mastering Your Food Processor’s Pace
“How long does food processing take?” is a question that highlights the importance of observation and control in the kitchen. While general guidelines exist, the true art lies in knowing your machine, understanding your ingredients, and mastering the pulse button.
By following the tips in this guide, you’ll not only gain a better sense of processing times but also develop the confidence to achieve consistent, perfect results every time you use your food processor. From lightning-fast chops to creamy purees, you’ll be well on your way to becoming a food processing pro, saving time and elevating your cooking!